
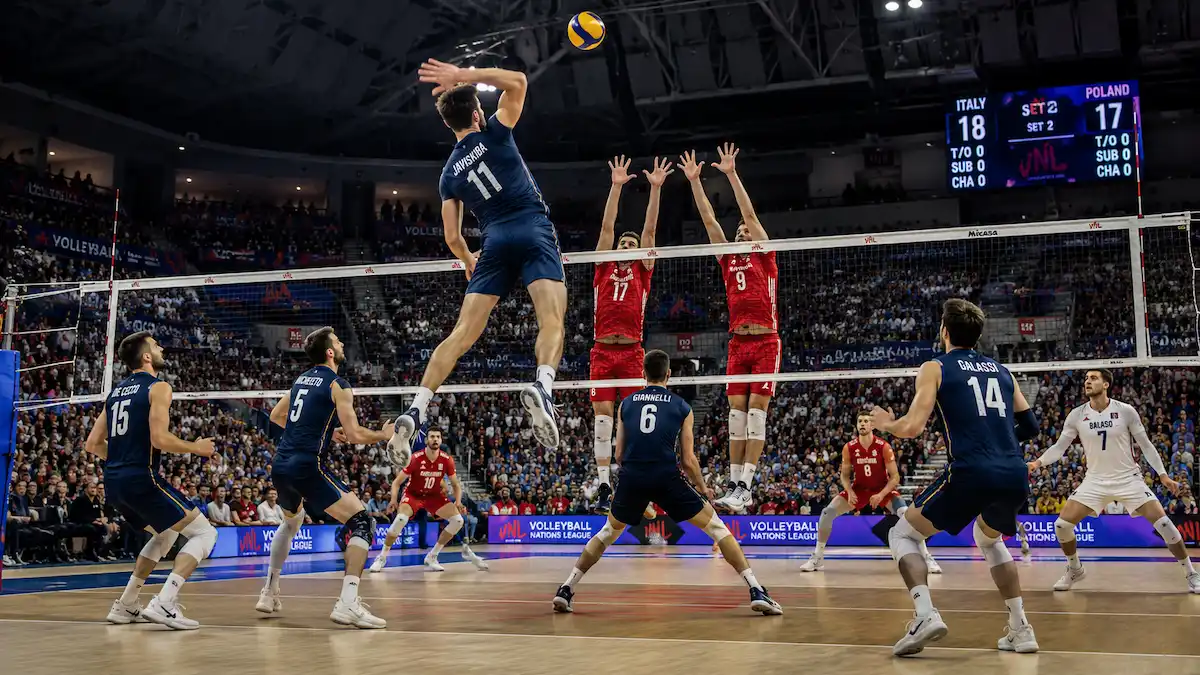
Introduction
Volleyball is more than just a game of keeping a ball from hitting the floor. It is a highly dynamic, explosive sport that requires split-second decision-making, exceptional teamwork, and supreme athletic agility. From the intense rallies inside professional arenas to the sun-drenched courts of Olympic beach events, volleyball has grown into one of the most popular and globally played sports in the world.
Whether you are a physical education teacher introducing the game to youth, a coach developing a high school team, or a player looking to refine your knowledge, understanding the foundations of volleyball is the first step toward mastery.
The Origins of the Game
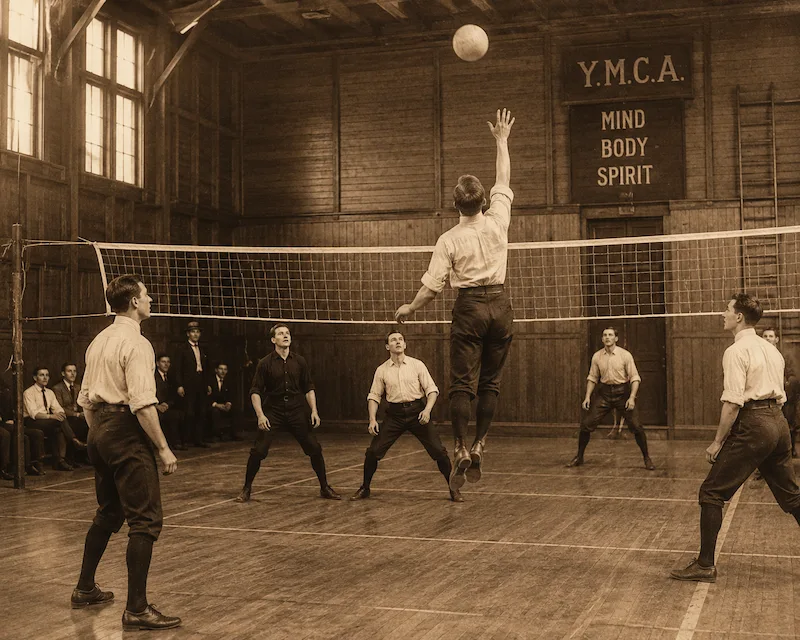
Volleyball was invented in 1895 by William G. Morgan, a physical education director at the YMCA in Holyoke, Massachusetts (USA). Originally called “Mintonette,” Morgan designed the game to be a less physically rough alternative to basketball (which had been invented just four years earlier in a neighboring town).
Morgan combined elements of basketball, baseball, tennis, and handball to create the new sport. The first volleyball net was actually borrowed from tennis, raised to a height of 6 feet, 6 inches. After an early exhibition match, an observer noted that the players seemed to be “volleying” the ball back and forth over the net, and the name was quickly changed to “Volleyball.”
Since then, the sport has evolved significantly. It was officially introduced to the Olympic Games in 1964 (Tokyo), and the fast-paced, highly specialized game we know today was born.
The Objective of the Game
At its core, the objective of volleyball is elegantly simple, yet executing it requires complex strategy.
Two teams compete on a divided court. The primary goal is to send the ball over the net in a way that grounds it on the opponent’s side of the court, while simultaneously defending your own side to prevent the opponent from doing the same.
A team is allowed a maximum of three touches (in addition to a block) to return the ball across the net. A typical, ideal offensive sequence consists of:
- The Pass (Bump/Dig): Receiving the opponent’s serve or attack.
- The Set: Delivering the ball into the air near the net.
- The Attack (Spike): Aggressively hitting the ball over the net into the opponent’s court.
The game is played as a continuous rally. The rally ends only when the ball touches the floor, goes out of bounds, or a team commits a rule violation.
Indoor vs. Beach Volleyball: The Core Differences
While the fundamental skills of bumping, setting, and spiking remain the same, Indoor and Beach volleyball are essentially two different sports, each requiring distinct athletic adaptations.
Scoring: Indoor matches are typically played as the “Best of 5” sets (sets played to 25 points). Beach matches are “Best of 3” sets (the first two sets played to 21 points).
The Court & Surface: Indoor volleyball is played on a hard wooden or synthetic floor measuring 18m x 9m. Beach volleyball is played on deep sand (which requires immense leg strength to jump) on a slightly smaller court measuring 16m x 8m.
Team Size: Indoor is a 6-on-6 game featuring highly specialized positions (liberos, middle blockers, setters). Beach is strictly a 2-on-2 game, meaning both players must be masters of every skill—serving, passing, setting, attacking, and blocking.
The Ball: The indoor ball is heavier, made of leather or synthetic leather, and moves much faster. The beach ball is slightly larger, softer, and lighter, designed to float more in the wind.
Court Dimensions & The Net System
To truly understand volleyball strategy, you must first understand the geometry of the court. The volleyball court is a perfectly measured arena where every line dictates player movement, defensive positioning, and offensive capabilities.
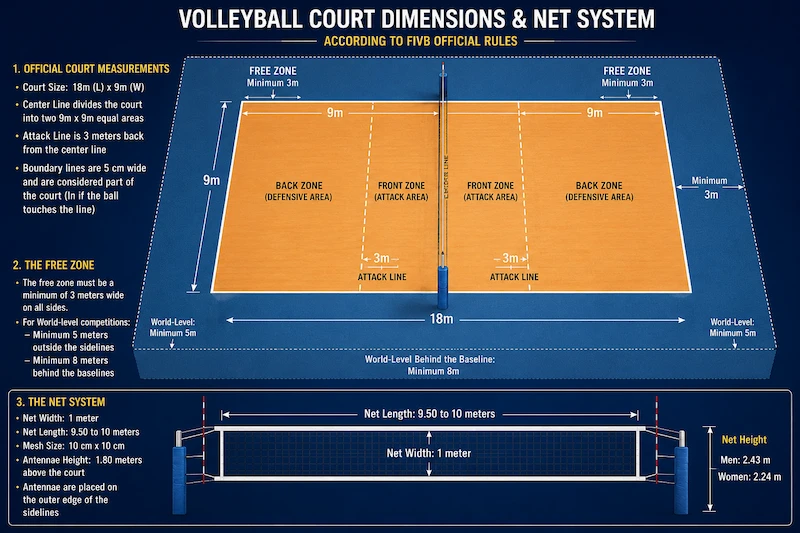
According to the FIVB (Fédération Internationale de Volleyball), the playing area consists of the actual court and the “free zone” surrounding it. Here is the detailed breakdown of the official dimensions and the net system.
1. Official Court Measurements
The indoor volleyball court is a perfect rectangle, clearly marked by boundary lines that are exactly 5 centimeters (2 inches) wide. Note that in volleyball, the boundary lines are considered part of the court; if a ball touches any part of the line, it is considered “In.”
- Overall Dimensions: The official court is 18 meters long and 9 meters wide (approx. 59 feet x 29.5 feet).
- The Center Line: This line divides the court directly in half, creating two equal 9m x 9m playing squares for each team.
- The Attack Line (The 3-Meter Line): This is one of the most important lines on the court. It is drawn exactly 3 meters (approx. 10 feet) back from the center line on both sides.
- Purpose: It divides the team’s side into the Front Zone (attack area) and the Back Zone (defensive area). Back-row players are strictly prohibited from jumping and attacking the ball above the net if they step on or over this line during takeoff.
- The Free Zone: The area outside the boundary lines where players can run to save a wild pass. It must be a minimum of 3 meters wide on all sides. For world-level professional competitions, the free zone must be at least 5 meters outside the sidelines and 8 meters behind the baselines.
2. The Net Specifications
The net is the central barrier of the game, completely dividing the two teams. It is placed vertically over the center line and measures 1 meter deep (top to bottom) and 9.5 to 10 meters long.
The height of the net varies depending on the gender and age group of the players:
- Official Men’s Height: 2.43 meters (7 feet, 11 ⅝ inches).
- Official Women’s Height: 2.24 meters (7 feet, 4 ⅛ inches).
- Youth Modifications: For younger age groups (under 14, under 12, etc.), the net is progressively lowered to accommodate their jumping ability and height, typically ranging from 2.00m to 2.13m.
3. Antennas and Posts
The net system isn’t just about the mesh and the cables; the hardware holding it up and marking the boundaries is strictly regulated.
- The Antennas: These are flexible fiberglass rods, 1.8 meters long and 10mm in diameter, painted with alternating red and white stripes. They are fastened to the net directly above the outer edges of the sidelines.
- Purpose: The antennas extend 80 centimeters above the net and mark the exact lateral boundaries of the “crossing space.” If a ball hits an antenna, or crosses the net outside the antennas, it is immediately ruled “Out.”
- The Posts: The metal poles supporting the net are placed 0.5 to 1 meter outside the sidelines. To ensure player safety, they must be smooth, completely devoid of dangerous wires, and heavily padded.
4. Court Zones (The 6 Positions)
For tactical communication, the team’s side of the court is divided into 6 imaginary zones. When coaches run plays or design defensive formations, they refer to these zone numbers.
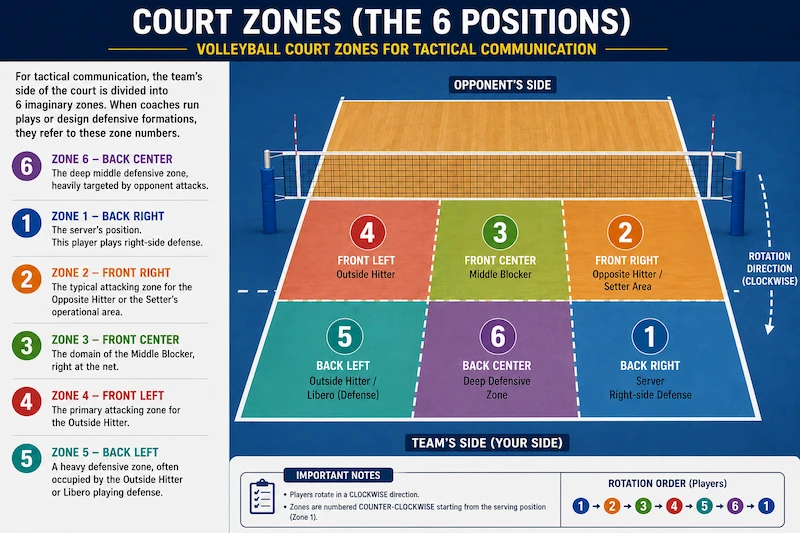
While players rotate in a clockwise direction, the zones themselves are numbered counter-clockwise, starting from the serving position:
Zone 6 (Back Center): The deep middle defensive zone, heavily targeted by opponent attacks.
Zone 1 (Back Right): The server’s position. This player plays right-side defense.
Zone 2 (Front Right): The typical attacking zone for the Opposite Hitter or the Setter’s operational area.
Zone 3 (Front Center): The domain of the Middle Blocker, right at the net.
Zone 4 (Front Left): The primary attacking zone for the Outside Hitter.
Zone 5 (Back Left): A heavy defensive zone, often occupied by the Outside Hitter or Libero playing defense.
Official Equipment & Gear
One of the greatest appeals of volleyball is its accessibility; fundamentally, all you need is a ball and a net. However, as players advance to competitive and professional levels, specialized equipment becomes absolutely critical. The right gear not only enhances athletic performance but also provides vital protection against the high-impact nature of the sport.
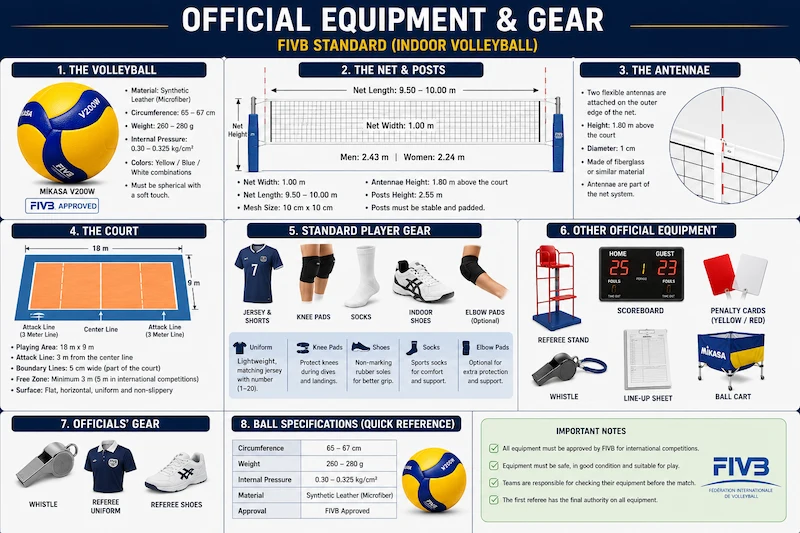
Here is a detailed breakdown of the official equipment and personal gear required for competitive volleyball.
1. The Official Volleyball
The volleyball itself is highly engineered to provide the perfect balance of weight, aerodynamics, and touch. Governing bodies enforce strict regulations on its design.
- Size and Weight: An official indoor volleyball must have a circumference of 65 to 67 centimeters (approx. 25.5 to 26.5 inches) and a weight of 260 to 280 grams (approx. 9 to 10 ounces).
- Material: Professional indoor balls are made of genuine leather or synthetic composite leather covering a rubber bladder. This material is designed to absorb the heavy impact of a spike while remaining soft enough for players to bump and set comfortably.
- Indoor vs. Beach: While indoor balls are heavily pressurized for a fast, sharp bounce, beach volleyballs are slightly larger, softer, and have lower internal pressure. Beach balls are also made from water-resistant synthetic materials and feature brighter colors to remain visible against the sun and sand.
2. Player Uniforms & The Libero Rule
Volleyball uniforms are designed for maximum mobility, breathability, and team identification.
- Standard Uniforms: Players wear jerseys and shorts made of lightweight, moisture-wicking synthetic fabrics (like spandex or polyester blends). These materials prevent the uniform from becoming heavy with sweat and allow for unrestricted overhead arm swings and deep defensive lunges.
- Numbering: According to FIVB rules, jerseys must have clearly visible numbers on both the front (at least 15 cm tall) and the back (at least 20 cm tall) to help referees track rotations and fouls.
- The Libero’s Contrasting Color: The Libero is a highly specialized defensive player with unique substitution rules. To ensure the referees can easily track them, the Libero is legally required to wear a jersey in a completely contrasting color to the rest of the team. For example, if the team wears dark blue, the Libero might wear bright orange or white.
3. Performance Footwear
Standard running shoes or casual sneakers are highly detrimental on a volleyball court. Volleyball requires specialized footwear engineered for the unique movements of the game.
- Gum-Rubber Soles: Indoor courts are made of highly polished wood or synthetic materials. Volleyball shoes feature a distinct gum-rubber outsole that provides extreme, squeaky traction, allowing players to stop instantly and change direction without slipping.
- Shock Absorption: A middle blocker or outside hitter may jump and land hundreds of times in a single match. Volleyball shoes contain advanced cushioning systems (like gel or air pockets) in the forefoot and heel to absorb massive impact and protect the knees and lower back.
- Lateral Support: Unlike running, which is a forward-motion sport, volleyball requires constant side-to-side (lateral) movement. The shoes are designed with reinforced sides and a wider base to prevent the ankle from rolling during quick lateral shifts.
4. Protective Gear
Volleyball is a non-contact sport between opponents, but it is a highly physical sport regarding contact with the floor and the ball. Protective gear is essential for longevity in the sport.
Arm Sleeves: While initially popularized for style, compression arm sleeves serve functional purposes. They keep the arm muscles warm, prevent floor burns during defensive dives, and help reduce the painful “sting” of receiving a 100 km/h jump serve on the forearms.
Knee Pads: The most iconic piece of volleyball gear. Knee pads feature high-density foam padding. They allow defensive players to confidently drop, dive, and sprawl onto the hard wooden floor to save low balls (digs) without shattering their kneecaps or suffering severe floor burns.
Ankle Braces: The most common injury in volleyball is a sprained ankle, usually occurring when a jumping player lands on the foot of a teammate or an opponent crossing the center line. Many professional and collegiate players wear rigid, lace-up ankle braces inside their shoes as a mandatory preventative measure.
Player Positions & Their Roles
In casual, backyard volleyball, players often just hit the ball whenever it comes near them. However, in competitive volleyball, the team operates like a highly tuned machine. Every player on the court has a specific, specialized role, and the success of the team relies entirely on how well these six players execute their individual jobs.
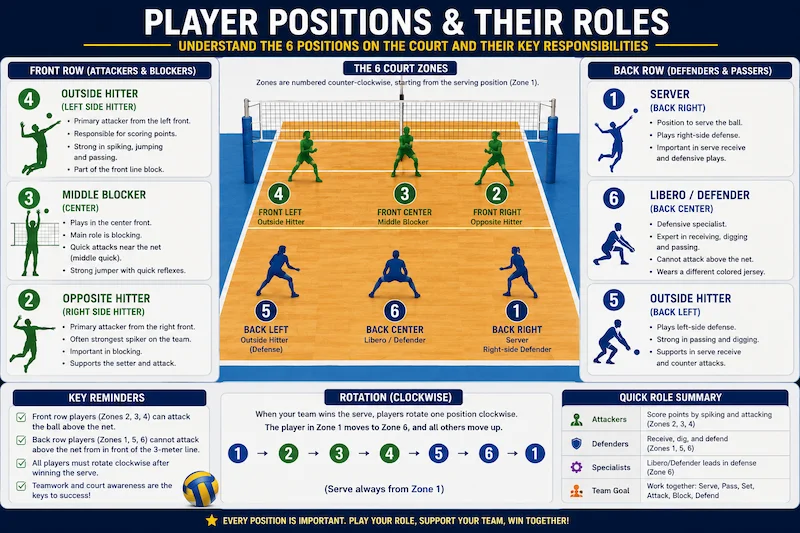
Here is a detailed breakdown of the specialized positions on a volleyball court and their strategic responsibilities.
1. The Setter (The “Quarterback”)
The Setter is the most critical position on the floor, acting as the brain and playmaker of the team’s offense. Much like a point guard in basketball or a quarterback in American football, the setter dictates the flow of the game.
- Primary Duty: To take the second touch (the pass) and deliver a perfectly placed, easily hittable ball to the attackers.
- Key Traits: Setters must have incredibly soft hands, elite decision-making skills, and deep tactical awareness. They need to memorize the opponent’s blocking schemes and know exactly which of their hitters has the best matchup on any given play.
- Court Positioning: They usually operate near Zone 2 (front right) or right of center, waiting for the defensive pass to arrive so they can distribute it to the left, middle, or right side.
2. The Outside Hitter (Left-Side Hitter)
The Outside Hitter is usually the primary focal point of the team’s offense. They are the high-flying athletes who get the most sets and are relied upon to score the most points.
- Primary Duty: Attacking the ball from Zone 4 (front left). Because a high, outside set gives the hitter the most time to adjust, Outside Hitters are often the “bailout” option when a play breaks down or a pass is poor.
- Defensive Responsibility: In addition to attacking, Outside Hitters must be exceptional at serve-receive (passing). They stay on the court for all six rotations, meaning they must be equally skilled at playing back-row defense and hitting out of the back row.
- Key Traits: Explosive jumping ability, a powerful arm swing, and the vision to hit around or through heavy double-blocks.
3. The Opposite Hitter (Right-Side Hitter)
As the name suggests, this player lines up diagonally opposite the Setter in the rotation. They operate on the right side of the court (Zone 2).
- Primary Duty: Providing a heavy offensive threat from the right side and serving as the primary defensive block against the opponent’s star Outside Hitter.
- Offensive Advantage: Left-handed players are highly prized for this position. Because the ball is coming from the setter on their left, a left-handed Opposite Hitter does not have to reach across their body to swing, making their attack much faster and harder to block.
- Defensive Role: Since they rarely participate in passing the opponent’s serve, they can focus entirely on transition offense and shutting down the left side of the net with a massive block.
4. The Middle Blocker (Middle Hitter)
The Middle Blocker is the first line of defense and the anchor of the team’s net presence. They are typically the tallest players on the roster.
- Primary Duty: To block the opponent’s attacks. A great Middle Blocker must instantly “read” the opponent’s setter, anticipate where the ball is going, and sprint along the net to form a solid double-block with their Outside or Opposite hitters.
- Offensive Role: They run fast, aggressive “quick sets” right next to the setter in Zone 3. Even if they don’t get the ball, their quick jump forces the opponent’s blockers to stay in the middle, freeing up space for the Outside Hitters.
- Court Positioning: Middle Blockers require immense energy to constantly jump and block. Therefore, when they rotate to the back row, they are almost always substituted out for the Libero to rest and allow a better defender to take over.
5. The Libero
The Libero (pronounced lee-bah-ro) is the ultimate defensive specialist. Introduced to the sport in 1998 to make rallies longer and more exciting, the Libero plays by a unique set of rules.
- Primary Duty: To receive the opponent’s hardest serves and dig the most aggressive spikes. They are the backbone of the team’s passing system.
- The Rules:
- They must wear a jersey of a contrasting color to stand out.
- They only play in the back row.
- They are strictly prohibited from attacking the ball if it is entirely above the height of the net.
- They cannot set the ball with an overhead finger pass if they are standing in front of the 3-meter attack line (they must bump-set instead).
- Substitutions: The Libero can substitute in and out of the back row infinitely, without it counting toward the team’s total substitution limit.
6. The Defensive Specialist (DS)
While similar to a Libero, a Defensive Specialist operates under normal substitution rules and wears the standard team jersey.
Versatility: Unlike the Libero, a DS is legally allowed to attack the ball above the net, serve, and set from anywhere on the court. They provide coaches with tactical flexibility to tighten up the team’s defense during crucial, high-pressure moments of a match.
Primary Duty: To come into the game to replace a player (usually a front-row attacker who has rotated to the back row) who is struggling with passing or defense.
Core Skills & Techniques (The Masterclass)
While physical athleticism—height, vertical jump, and speed—is vital in volleyball, the sport is ultimately won by the team that executes fundamental skills with the highest mechanical precision under pressure. Volleyball is a game of angles, timing, and refined muscle memory.
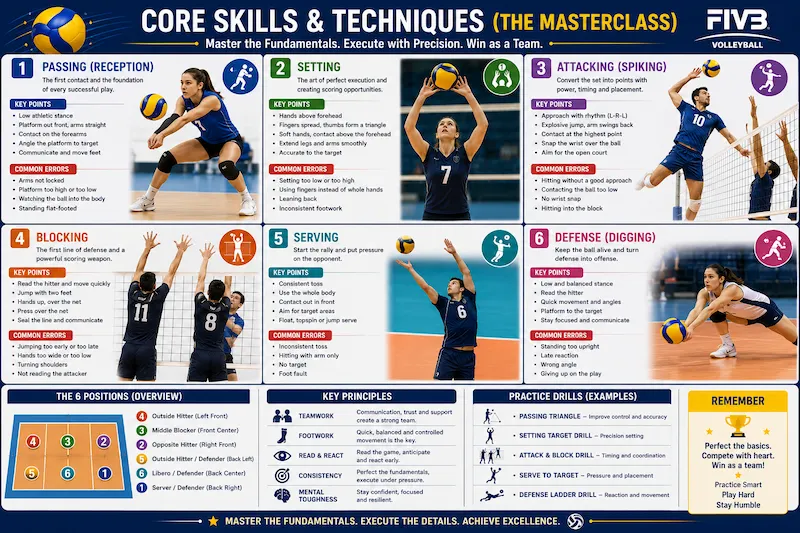
Here is a technical masterclass breaking down the six core skills of volleyball: Serving, Passing, Setting, Attacking, Blocking, and Digging.
1. Serving (The Action Starter)
The serve is the only skill in volleyball where the player has complete control over the ball, time, and execution. It is the beginning of every rally and is the team’s first offensive weapon. A great serve disrupts the opponent’s offensive system before it can even begin.
The Mechanics:
- The Stance: A balanced staggered stance, facing the target. The ball is held in the non-dominant hand (the tossing hand), with the dominant arm (the striking arm) cocked back in a “bow-and-arrow” shape, elbow high and back.
- The Toss: This is the most crucial step. A consistent, precise toss leads to a consistent serve. The toss should be high enough to allow the striking arm to fully extend at contact, but low enough to maintain control.
- The Contact: The server transfers weight from the back foot to the front foot. The dominant hand must be completely flat and rigid. The ball must be struck with the palm and heel of the hand, not the fingers, to transfer maximum force.
Types of Serves:
- Underhand Serve: The easiest to learn. The server holds the ball low and swings the striking arm like a pendulum, hitting the ball out of the holding hand. (Recommended strictly for beginners/youth).
- Float Serve: The most common and deceptive serve. The server strikes the ball without creating any spin. The smooth surface of the ball creates unpredictable air friction, causing the ball to “float,” “knuckle,” or drop suddenly, making it very difficult to pass.
- Jump Float Serve: An advanced float serve executed while jumping. This adds velocity and allows the ball to be served at a lower, sharper angle over the net.
- Jump Topspin Serve (Power Serve): An explosive, high-risk, high-reward serve. The server executes a powerful spike approach behind the baseline, tossing the ball extremely high, jumping, and striking the ball with extreme forward spin. It moves faster than a float serve, but its predictable arc is often easier for elite defenders to receive if they can handle the velocity.
2. Passing (The First Touch / “The Bump”)
Also known as the forearm pass or “the dig,” passing is the foundation of a team’s offense. Its primary goal is to receive the opponent’s serve or attack and direct it with high accuracy to the Setter.
The Mechanics:
- The Stance: A low, athletic base with knees bent, feet wider than shoulder-width, and weight on the balls of the feet (not the heels). The upper body should be tilted slightly forward.
- The Platform: This is the “face” that contacts the ball. The player places their wrists together, overlaps their hands (without crossing fingers), and locks their elbows completely straight. By pressing the thumbs downward, the flat, meaty part of the forearms creates a perfect surface.
- The Angle: The player does not swing their arms at the ball; this leads to erratic control. Instead, they position themselves behind the ball and create a rigid angle with their platform, letting the ball’s natural velocity deflect toward the setter. They provide a minor “push” with the legs for extra distance if needed.
3. Setting (Volleying / The Second Touch)
Setting is the art of directing the ball into an ideal, hittable position for an attacker. It is primarily executed with an overhead finger pass (volley). The Setter’s “touch” dictates the speed and tempo of the offense.
The Mechanics:
- Hand Position: The hands are brought high above the forehead, not directly in front of the face. The fingers should be relaxed and shaped into a triangle or a “diamond” shape, forming a natural pocket for the ball.
- Contact: The Setter contacts the ball strictly with the pads of their fingertips, never the palms. This must be a single, smooth, rapid contact (FIVB and domestic rules heavily penalize “lifts” or Prolonged Contact).
- Body Posture: The Setter should be squared to the Zone 4 (left-side) attacking area. As the ball is contacted, they extend their arms and use their legs to provide a smooth, upward momentum, propelling the ball toward the hitter.
4. Attacking (Spiking / The Kill)
Attacking is the primary mechanism for scoring points during a rally. A spike is an aggressive, high-speed strike of the ball intended to ground it on the opponent’s side or defect off the block (“tooling the block”).
The Mechanics (The 4-Step Approach for a Right-Handed Attacker):
- Step 1 (The Timing Step): A small step with the left foot to sync with the setter.
- Step 2 (The Acceleration Step): A larger, faster step with the right foot, bringing the arms high and back.
- Step 3 & 4 (The Plant & Jump): A final, rapid “Left-Right” step close together, planting the feet hard and exploding vertically while aggressively swinging both arms up for maximum momentum.
- The Arm Swing: In mid-air, the attacking arm is cocked back in a powerful “bow-and-arrow” shape (elbow high, palm facing away).
- The Contact & Follow-Through: The player snaps their abdomen forward, rotating the body to unleash power. The ball is struck at the highest possible point with an open, rigid hand. A crucial wrist snap creates topspin, driving the ball downward over the net.
5. Blocking (The First Line of Defense)
Blocking is a net skill designed to deny an attack by forming a solid “wall” in mid-air, returning the ball instantly to the opponent’s court or slowing it down (“soft blocking”) so the back-row defense can dig it.
The Mechanics:
- The Stance: The player stands close to the net (Zone 3, 2, or 4), knees slightly bent, with their hands held high (at or above head level), palms facing the opponent. They must be ready to jump instantly.
- The Footwork: Middle blockers use complex “shuffle” or “swing” footwork to rapidly move laterally along the net to help Outside or Opposite hitters form a Double Block against an attacker.
- The Penetration: A great blocker does not just jump up. They actively reach over the net (called “penetration”), pressing their shoulders and extending their open, rigid hands deep into the opponent’s court to “seal” the space above the net.
6. Digging (Back-Row Defense)
Digging is a skill used strictly to save hard-driven spikes (attacks) that have cleared the block. It combines the low posture of passing with extreme reactionary speed.
The Mechanics:
Emergency Defense (Advanced): If the ball is too far away, advanced defenders utilize “pancakes” (sliding on the stomach and placing a flat hand under the ball just before it hits the floor) or rolls to return the ball while safely dissipating the momentum of a dive.
Defensive Posture: To dig a hard spike, the player must operate much lower than standard passing. The knees are deeply bent, almost touching the floor. The platform is already formed and held low, waiting for the ball to arrive.
Creating the Angle: Hard spikes create extreme velocity. Similar to passing a serve, the digger does not swing; they use their platform to create a sharp upward angle, deflecting the ball high and toward the center of the court so the Setter can still run an offense.
Rules, Scoring, & Regulations
Volleyball is a fast-paced game of high-flying offense and spectacular defense, but it is strictly governed by a complex set of rules. These regulations ensure fair play, maintain the structured flow of the game, and protect player safety. Understanding these rules is absolutely essential for coaches, referees, and players to avoid giving away free points through technical violations.
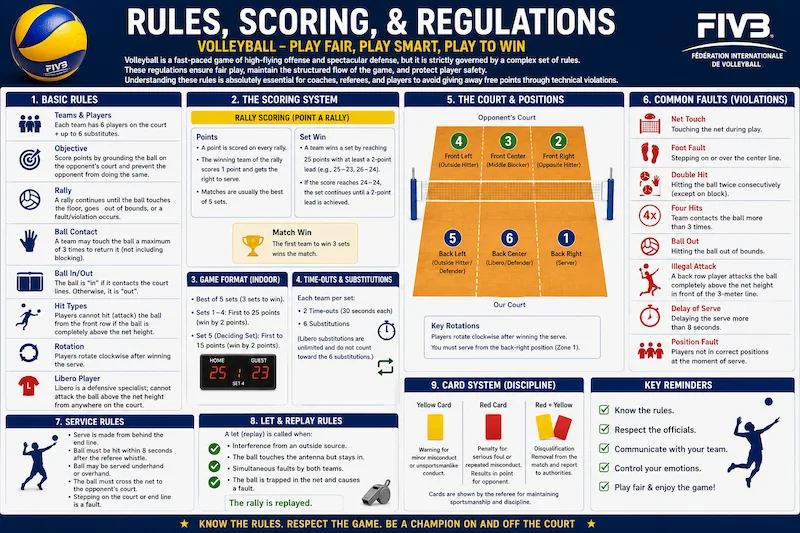
Here is a comprehensive breakdown of the scoring systems, rotation rules, and most common violations in official volleyball.
1. The Rally Scoring System & Match Format
In the past, volleyball used “side-out scoring,” where a team could only score a point if they were the serving team. However, to make the game more predictable in length and exciting for television broadcasts, the Rally Scoring System was universally adopted in 1999.
- Rally Scoring: Under this system, a point is awarded at the end of every single rally, regardless of which team served the ball. If the receiving team wins the rally, they score a point and also earn the right to serve (this is called a “side-out”).
- Set Format (To 25 Points): A standard indoor professional or collegiate match is played as a “Best of 5 Sets.” The first four sets are played to 25 points.
- The “Win by Two” Rule: To win a set, a team must have a minimum lead of two points. If the score is tied at 24-24, the set continues indefinitely (e.g., 26-24, 28-26) until one team secures a two-point advantage.
- The Deciding 5th Set: If the match is tied at 2 sets each (2-2), the final 5th set is played to only 15 points (still requiring a two-point advantage to win). Teams will switch sides of the court once a team reaches 8 points in this final set.
2. The Rotation Rule
The rotation system ensures that every player (except the specialized Libero) must play both in the front row at the net and in the back row on defense.
- Clockwise Movement: When a team wins the rally and earns the right to serve back from the opponent (a side-out), the players on that team must rotate one position clockwise. For example, the player in Zone 2 (front right) moves to Zone 1 (back right) to serve.
- Positional Faults (Out of Rotation): At the exact moment the server strikes the ball, every player on the court must be in their correct rotational order. If players overlap or stand in the wrong zone before the serve is hit, the referee will blow the whistle, award a point to the opposing team, and declare a rotational fault. Once the ball is served, players are free to move and switch positions within their respective front or back rows.
3. Common Violations & Faults
Beyond the ball hitting the floor or going out of bounds, rallies frequently end due to technical faults committed by the players.
- Lifts and Carries (Prolonged Contact): A player must make clean, instantaneous contact with the ball. If the ball rests, rolls, or is caught in the player’s hands or arms for even a fraction of a second, it is called a lift. This frequently happens during sloppy underhand passes or slow overhead sets.
- Double Touches (Double Contact): A single player cannot touch the ball twice consecutively. If a setter’s hands do not touch the ball at the exact same time, creating an uneven spin, the referee will call a double touch. (Exception: A blocker can touch the ball during a block, and immediately play the ball again for the team’s first touch).
- Net Violations: A player is completely prohibited from touching the net (the mesh, the top tape, or the antennas) during the action of playing the ball. If a hitter’s jersey brushes the net during their jump or landing, it is an immediate fault, and the point goes to the opponent.
- Center Line Fault (Foot Fault): For player safety, crossing the center line under the net is heavily regulated. A player may step on the center line, but if their entire foot, hand, or body part completely crosses over the line into the opponent’s court, it is a fault.
- Serving Foot Fault: When executing a serve, the server must not step on or cross the baseline until they have made contact with the ball.
- Four Hits: A team is only permitted a maximum of three contacts (excluding a block) to return the ball. If a team touches it four times, it is a violation.
4. The Libero Rules & Restrictions
Because the Libero is granted the unique privilege of unlimited substitutions to anchor the team’s defense, they are restricted from participating in the offense. The Libero is governed by these strict regulations:
Serving Restrictions: In standard international FIVB play, the Libero is strictly forbidden from serving. (Note: In some domestic leagues, like USA Volleyball or NCAA, the Libero is allowed to serve in one specific rotational position).
No Attacking: The Libero cannot spike or attack the ball if the ball is entirely above the height of the net, regardless of where they are on the court.
No Blocking: The Libero is not allowed to block or even attempt to block at the net.
The Setting Restriction (The 3-Meter Rule): This is the most complex Libero rule. If the Libero is standing in front of the 3-meter attack line (in the front zone), they cannot use an overhead finger pass (a traditional set) to set the ball to an attacker. If they do, the attacker is not legally allowed to hit the ball above the net. To set from the front zone, the Libero must use a forearm bump-set. (They are free to use an overhead finger set if they are standing behind the 3-meter line).
Team Strategy: Offense vs. Defense
At the beginner level, volleyball is often a reactionary game—players simply try to keep the ball off the floor. However, at the competitive and elite levels, volleyball transforms into a high-speed game of physical chess. Teams utilize complex offensive systems to confuse the opponent’s blockers and strict defensive formations to counter those attacks.
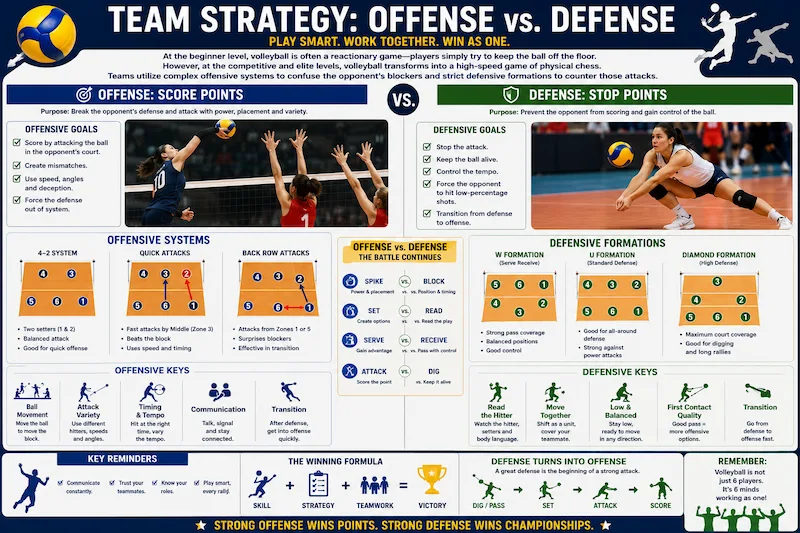
Understanding these strategic systems is what separates a group of good individual athletes from a championship-winning team.
1. Offensive Systems: The Numbers Game
Volleyball offensive systems are defined by a two-number naming convention (e.g., 5-1, 6-2). The first number represents the number of designated hitters (attackers) on the court, and the second number represents the number of designated setters.
- The 5-1 System (The Professional Standard):
- How it works: The team uses 5 hitters and 1 dedicated setter. This setter stays on the court for all six rotations, setting from both the front row and the back row.
- The Advantage: Consistency. Because there is only one setter, the hitters get used to the exact timing, height, and tempo of every set. The setter becomes the undisputed “Quarterback” and leader of the offense.
- The Drawback: When the setter rotates into the front row, the team only has two front-row attackers available. Additionally, if the setter is short, it creates a weak spot in the team’s blocking defense at the net.
- The 6-2 System (Maximum Offense):
- How it works: The team uses 6 hitters and 2 setters. The two setters play diagonally opposite each other in the rotation. The rule of the 6-2 is that the setter who is in the back row always runs up to set the ball. When that setter rotates to the front row, they become an attacker, and the other setter (now in the back row) takes over the setting duties.
- The Advantage: The team will always have three front-row attackers available, providing maximum offensive firepower at all times.
- The Drawback: It requires having two setters of near-equal elite ability, which is rare. If the setters have different tempos or styles, the hitters can struggle to find their rhythm.
- The 4-2 System (Beginner / Intermediate):
- How it works: The team uses 4 hitters and 2 setters. Unlike the 6-2, in this system, the setter who is in the front row does the setting.
- The Advantage: It is incredibly simple to learn. Because the setter is already standing at the net in the front row, the back-row players have an easy, stationary target to pass to. It is highly recommended for youth and middle school teams.
- The Drawback: With the front-row setter taking the second touch, there are only two front-row attackers left to hit the ball, making the offense predictable and easy to block.
2. Defensive Formations: Guarding the Court
Defense in volleyball is a highly coordinated dance between the front-row blockers and the back-row diggers. The defense is entirely dictated by the block. If the blockers take away one angle of the court, the back-row defenders must shift to cover the remaining open spaces.
If the two blockers do not close the gap between them properly, they leave a “seam” (a hole in the block). The back-row defender must instantly recognize this seam and step directly into that line of sight, knowing the attacker will likely try to spike the ball right through the gap.
Perimeter Defense (The Base System):
How it works: In this system, the back-row defenders (usually Zones 1, 6, and 5) stay deep, close to the boundary lines (the perimeter) of the court. They keep their feet planted near the sidelines and baseline.
The Strategy: This defense is designed to dig hard-driven spikes. By staying deep, the defenders give themselves the maximum amount of time (fractions of a second) to react to a 100 km/h spike. If the attacker decides to hit a soft “tip” over the block, the defenders must sprint forward to save it.
Rotational Defense (Advanced Adjustment):
How it works: Unlike the static Perimeter defense, Rotational defense involves players actively shifting (rotating) toward the point of attack the moment the ball is set.
The Strategy: If the opponent sets the ball to their Outside Hitter (Zone 4), the defending team’s Zone 1 player might shift up behind the block to pick up short tips, while the Zone 6 player rotates hard toward the sideline to dig the deep cross-court shot. This system is highly dynamic and requires excellent team communication to ensure no empty zones are left behind.
Reading the Attacker & Playing the “Seam”:
Elite defenders do not guess; they “read.” A back-row defender watches the attacker’s approach angle, the swing of their arm, and the position of the blockers.
The Blueprint: Skill Development According to Age Groups
One of the most common mistakes in youth volleyball is treating young athletes like miniature adults. Throwing a complex 5-1 offensive system or demanding aggressive jump-serving from a beginner not only stunts their technical development but drastically increases the risk of burnout and injury.
Skill acquisition in volleyball must be completely progressive. A physical education curriculum or coaching program must adapt the court, the equipment, and the tactical expectations to the physical and cognitive realities of the age group.
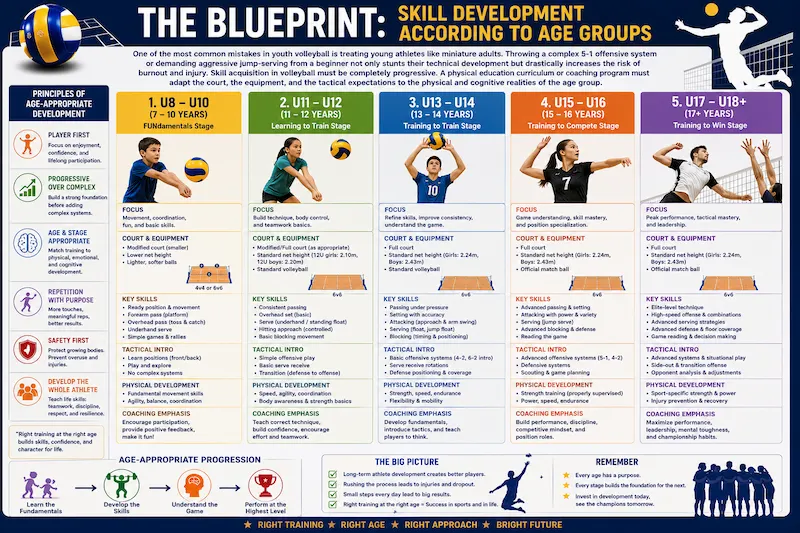
Here is the blueprint for long-term athlete development in volleyball.
1. The Foundation Phase (Ages 8–11 / Primary School)
At this stage, the absolute priority is gross motor skill development, hand-eye coordination, and making the game fun. Players at this age lack the upper-body strength to push a standard ball to the net or the spatial awareness to track a fast-moving object accurately.
- Equipment Modifications: Use a “Volley-Lite” ball (same size, 25% lighter) to prevent wrist pain and encourage proper passing platforms. The net should be significantly lowered (approx. 2.00m or 6 ft 6 in).
- Skill Focus:
- Tracking the ball’s trajectory (learning to move the feet to get behind the ball).
- Basic forearm passing posture.
- Underhand serving just to get the ball in play.
- Tactical Focus: Zero specialization. Every player should play every position. The only “system” is teaching players to return the ball in three touches (Pass, Set, Attack) rather than simply swatting it back over the net on the first touch.
2. The Tactical Introduction Phase (Ages 12–14 / 7th & 8th Grade)
This is arguably the most critical transition phase in a player’s career. As students enter 7th and 8th grade, physical disparities widen, and competitive play—such as structured inter-house competitions and district-level tournaments—begins in earnest. The game starts looking like “real” volleyball.
- Equipment Modifications: Transition to the standard weight regulation ball. The net moves to standard youth/middle school heights (2.13m to 2.24m).
- Skill Focus:
- The Overhand Serve: This is the primary hurdle. Players must develop the core strength and arm mechanics to consistently serve overhand.
- Attacking Footwork: Teaching the 4-step approach without the ball, then slowly incorporating the jump and swing.
- Tactical Focus: Introduction of the 4-2 Offensive System. This is the perfect age to introduce specialized roles (designating specific players as Setters or Hitters). The 4-2 keeps the setter in the front row, giving these U-14 players a simple, stationary target to aim their passes toward under the pressure of a match.
3. The Specialization Phase (Ages 15–18 / High School)
By high school, athletes have developed the necessary fast-twitch muscle fibers for explosive jumping and the cognitive ability to read complex opponent formations. This phase is about refining mechanics, increasing velocity, and mastering specialized positions.
- Equipment: Full adult regulation net heights (2.43m for boys, 2.24m for girls) and standard balls.
- Skill Focus:
- Positional Mastery: Middle blockers learn to run fast “quick” sets; Liberos master reading the hitter’s shoulder to dig hard spikes; Setters learn to jump-set to speed up the offense.
- Advanced Serving: Transitioning from basic overhand serves to tactical float serves targeting specific weak passers, and introducing topspin jump serves.
- Double Blocking: Learning the lateral footwork required to close the seam at the net consistently.
- Tactical Focus: Implementation of the 5-1 or 6-2 Offensive Systems. Defensively, teams move from static perimeter defense to dynamic rotational defense, actively adjusting to the opponent’s attacking tendencies.
Development Snapshot
| Age Group | Recommended Ball | Primary Skill Focus | Recommended System |
| U-12 | Volley-Lite | Ball tracking, passing platform, underhand serve | Universal rotation (No specialization) |
| U-14 (7th-8th Grade) | Standard Regulation | Overhand serve, 4-step attack approach, passing accuracy | 4-2 System (Front-row setter) |
| U-18 (High School) | Standard Regulation | Jump serving, blocking footwork, defensive reading | 5-1 or 6-2 System |
A Note for Coaches: Winning an Under-14 district tournament by having your strongest player simply hit the ball over on the first touch might secure a trophy today, but it destroys the team’s ability to play high-level volleyball tomorrow. Always prioritize the process of the three-touch system (Pass, Set, Attack) over immediate scoreboard results during the developmental years.
Essential Practice Drills & Conditioning for All Levels
A common trap in volleyball coaching is spending too much time on static, isolated skills (like hitting against a wall) and too little time on dynamic, game-like scenarios. Volleyball is a sport of constant transition and rapid problem-solving. Practice structures must reflect this reality to effectively prepare athletes for live competition.
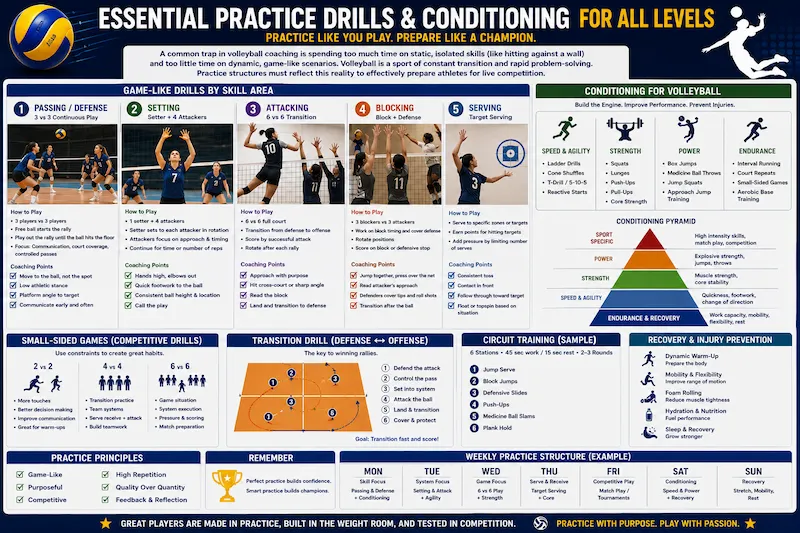
Here is a curated selection of essential drills and volleyball-specific conditioning protocols designed to maximize court time and translate directly to match performance.
1. The Butterfly Drill (Serve & Pass Efficiency)
This is a staple drill used from middle school physical education classes all the way to professional arenas. It allows a large number of players to get continuous repetitions in the two most crucial aspects of the game: serving and serve-receive.
1.Establish the Positions:Set up both sides of the court.
Place a target player (usually a Setter) in Zone 2 on both sides of the net. Form a serving line behind the baseline and a passing line in Zone 5 on both sides.
2.Execute the Serve:
The server strikes the ball over the net, aiming directly for the passer in Zone 5 on the opposite side.
3.Execute the Pass:
The passer tracks the ball and uses their forearm platform to pass the ball cleanly to the target player in Zone 2.
4.Follow the Ball:The critical rotation rule.
After completing their action, every player follows the trajectory of their ball. The Server sprints under the net to become the next Passer. The Passer sprints to become the next Target. The Target catches the ball and jogs to the serving line.
2. The “Wash” Drill (High-Pressure Scrimmage)
Standard scrimmaging (simply playing to 25 points) is highly inefficient for development because the ball is frequently dead, and players spend too much time walking back to their positions. The “Wash” drill artificially injects pressure and forces teams to earn their points through sustained excellence.
- The Setup: Six players are on the “A-Side” (the starting lineup), and six players are on the “B-Side” (the challengers).
- The Rules: To score a single “Big Point,” a side must win two consecutive mini-rallies (a “wash”).
- The Execution: The coach tosses a free ball to the A-Side to start the first rally. If the A-Side wins, they get the advantage. The coach then immediately tosses a second, harder ball (or requires a serve) to the B-Side. If the A-Side defends successfully and wins the second rally, they score 1 Big Point. If the teams split the rallies (1-1), the score “washes” out, no points are awarded, and the drill resets.
- The Value: It forces players to stay mentally engaged through long transitional phases and punishes unforced errors heavily.
3. The Queen/King of the Court (Small-Sided Games)
This is an excellent drill for developing court awareness, communication, and cardiovascular endurance, particularly when managing a large group of students.
- The Setup: Divide the roster into teams of three. One team starts on the “Champion” side of the net. Another team starts on the “Challenger” side. The remaining teams wait in line off the court.
- The Execution: The coach tosses a ball to the Challengers to initiate the rally. If the Champions win the rally, they stay on their side, earn a point, and face the next team in line. If the Challengers win, they immediately sprint under the net to take over the Champion side, and a new team steps on to challenge them.
- The Value: It requires players to cover significantly more court area (3-on-3 instead of 6-on-6), radically accelerating their defensive reading abilities and fitness.
Volleyball-Specific Conditioning
Volleyball is an anaerobic power-endurance sport. Players do not run long distances; instead, they execute hundreds of maximum-effort, explosive jumps and aggressive lateral sprints over a two-hour match. Long-distance jogging (aerobic conditioning) does very little to improve volleyball performance and can actually dampen fast-twitch muscle response.
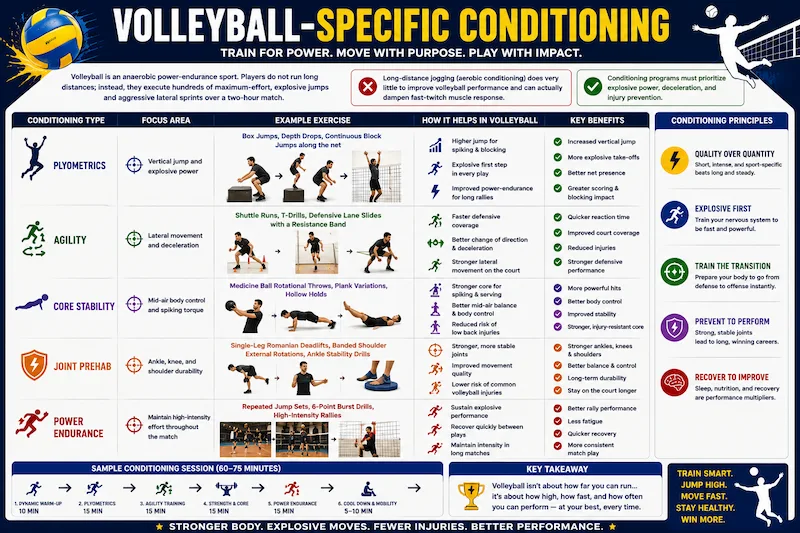
Conditioning programs must prioritize explosive power, deceleration, and injury prevention.
| Conditioning Type | Focus Area | Example Exercise |
|---|---|---|
| Plyometrics | Vertical jump and explosive power | Box jumps, depth drops, continuous block jumps along the net |
| Agility | Lateral movement and deceleration | Shuttle runs, T-drills, defensive lane slides with a resistance band |
| Core Stability | Mid-air body control and spiking torque | Medicine ball rotational throws, plank variations, hollow holds |
| Joint Prehab | Ankle, knee, and shoulder durability | Single-leg Romanian deadlifts, banded shoulder external rotations |
Coach’s Note: The most dangerous moment in volleyball is the landing, not the jump. Dedicated conditioning time must be spent teaching athletes how to land softly with bent knees and engaged glutes to protect the ACL and lower back during heavy tournament days.
Scouting, Analytics, & Match Preparation
At the elite levels of volleyball, physical prowess alone is rarely enough to secure a championship. Matches are won and lost in the margins—by exploiting a specific rotational weakness, recognizing setter tendencies, or identifying an opponent’s weakest passer.
Modern volleyball relies heavily on data and strategic planning. Here is how competitive teams scout opponents, utilize analytics, and execute a structured game-day protocol.
1. The Art of Scouting (Reading the Opponent)
Scouting is the process of analyzing an opponent’s systems before the match begins to formulate a winning game plan. A comprehensive scouting report focuses on three critical areas:
- Serve-Receive Vulnerabilities: Every team has a weak link in their passing formation. A scouting report identifies this player (the “target”) and the exact zones they struggle to cover. Servers will intentionally serve short or deep to force this specific player to pass, disrupting the opponent’s entire offense.
- Setter Tendencies: The setter is the decision-maker. Scouting analyzes where the setter goes under pressure. If the pass is bad, do they default to the Outside Hitter 90% of the time? If so, the defense can commit early to blocking the left side.
- Attacker Shot Charts: Great defensive teams track exactly where an opponent’s star hitter likes to spike the ball. If their Outside Hitter heavily favors a deep cross-court shot, the defense will shift their back-row diggers into that exact lane before the ball is even set.
2. Statistical Analytics (The Numbers)
Volleyball is incredibly fast, and subjective observation can often be misleading. Coaches use statistical formulas to measure true efficiency and remove emotion from their tactical decisions.
The 3-Point Passing Scale
Passing efficiency dictates offensive options. Every serve-receive is graded on a strict 0 to 3 scale:
| Grade | Pass Quality | Resulting Offensive Options |
| 3 Point | Perfect | The setter is stationary in Zone 2/3. All attackers (including quick middle attacks) are available. |
| 2 Point | Good | The setter moves slightly. The middle attack is difficult, but outside and opposite hitters are fully available. |
| 1 Point | Poor | The setter is pulled far off the net or into the backcourt. The only safe option is a high, predictable set to the Outside Hitter. |
| 0 Point | Error | An ace or a “shanked” pass that cannot be played by the setter. |
Team Benchmark: A team passing average above 2.20 is considered elite and will almost always result in an efficient offense.
Hitting Percentage (Efficiency)
This is the ultimate measure of an attacker’s value. It calculates not just how many points they score, but how many errors they make in the process. The formula is:
$$\text{Hitting Percentage} = \frac{\text{Kills} – \text{Errors}}{\text{Total Attempts}}$$
- Kill: An attack that directly results in a point.
- Error: Hitting the ball out of bounds, into the net, or getting stuffed by a block.
- Attempt: Any swing that does not result in a direct kill or error (e.g., the defense digs it).
Benchmark: A hitting percentage of .300 or higher is considered excellent at the competitive level.
Explore the math behind these metrics using this interactive dashboard. You can plug in hypothetical match numbers to see how just a few unforced errors can drastically crash a team’s overall efficiency.
Volleyball Analytics Calculator
Hitting Percentage
Calculate attacker efficiency.
Passing Average
Calculate serve-receive efficiency.
How to Use This Tool
Hitting Percentage
- Total Kills: Attacks that resulted in a direct point.
- Total Errors: Attacks hit out of bounds, into the net, or directly blocked.
- Total Attempts: Total number of swings (Kills + Errors + Balls dug by the opponent).
Benchmark: A score of .300 or higher is considered excellent at the competitive level.
Passing Average
- 3-Point (Perfect): Setter has all offensive options available.
- 2-Point (Good): Setter moves slightly, limited middle attack.
- 1-Point (Poor): Setter is pulled off the net, predictable high outside set.
- 0-Point (Error): An ace or unplayable shanked pass.
Benchmark: A team average above 2.20 indicates an elite serve-receive formation.
3. Match Preparation & The Warm-up Protocol
Game day requires a rigid, predictable routine to physically prepare the athletes’ bodies for explosive movement and mentally lock them into the scouting report. International and collegiate matches follow a strict, standardized countdown to the first whistle.
Dynamic Warm-up & Stretching
60 Minutes Prior
Off-court preparation. Players engage in light jogging, dynamic stretching, and band work to activate the shoulders, hips, and knees. No volleyballs are used.
Ball Control & Pepper
45 Minutes Prior
Teams take the court to begin “pepper” (partner passing, setting, and controlled hitting) to establish touch and hand-eye coordination.
Official Net Warm-up (Spiking)
30 Minutes Prior
The teams split the time at the net. Hitters execute full-speed approach jumps and spikes while setters work on location. This is often used to physically intimidate the opponent.
Serving & Final Adjustments
10 Minutes Prior
Both teams share the court for a serving period, adjusting to the air currents and lighting of the specific gymnasium.
First Whistle
0 Minutes Prior
Starting lineups are checked by the referee, the Libero is cleared to enter, and the match officially begins.
Nutrition, Recovery, & Injury Prevention
While mastering the mechanics of serving, setting, and spiking is crucial, a volleyball player’s true potential is unlocked off the court. The explosive nature of volleyball—constant jumping, diving, and rapid lateral movements—places immense stress on the body. To maintain peak performance throughout a grueling tournament and a long season, athletes must treat their bodies like high-performance engines.
This chapter breaks down the three pillars of off-court athletic success: Nutrition, Recovery, and Injury Prevention.
1. Fueling for Performance: Volleyball Nutrition
Volleyball relies heavily on the anaerobic energy system for quick bursts of power, supported by the aerobic system for endurance during long rallies and five-set matches. Proper fueling dictates how high you can jump in the fifth set.
- Pre-Match Meal (3-4 Hours Before): Focus on complex carbohydrates for sustained energy and lean protein to prevent hunger. Avoid heavy, high-fat, or high-fiber foods that take too long to digest.
- Example: Grilled chicken with brown rice, or whole-wheat pasta with a light tomato sauce.
- Pre-Match Snack (30-60 Minutes Before): Quick-digesting simple carbohydrates to top off glycogen stores.
- Example: A banana, a handful of pretzels, or a sports drink.
- Hydration Strategy: Dehydration directly impacts vertical jump height and cognitive reaction time. Athletes should drink 16-20 ounces of water 2-3 hours before playing. During the match, aim for 4-8 ounces every time there is a timeout or substitution.
- Post-Match Recovery Meal (Within 45 Minutes): The “anabolic window” requires a 3:1 ratio of carbohydrates to protein to replenish glycogen and repair micro-tears in the muscles.
- Example: Chocolate milk (nature’s perfect recovery drink), or a whey protein shake with a banana.
2. The Science of Recovery
You do not get stronger or faster during practice; you get stronger during recovery. A well-structured recovery protocol is non-negotiable.
- Sleep (The Ultimate Performance Enhancer): Adolescent and young adult athletes require 8-10 hours of sleep per night. Sleep is when the body releases Human Growth Hormone (HGH) for muscle repair and central nervous system recovery.
- Active Recovery: After a heavy match day, complete rest can lead to stiffness. Active recovery—like light swimming, cycling, or a brisk walk—increases blood flow to muscles, clearing out metabolic waste (lactic acid) without adding stress to the joints.
- Myofascial Release (Foam Rolling): Daily foam rolling breaks up adhesions in the fascia (the connective tissue surrounding muscles). Volleyball players must focus on their calves, quads, IT bands, and the thoracic spine to maintain mobility.
3. Preventing Common Volleyball Injuries
Volleyball is a non-contact sport, but it has a high rate of overuse and acute injuries. A proactive pre-habilitation routine is the best defense.
A. Patellar Tendonitis (Jumper’s Knee)
The constant eccentric force of landing from jumps causes micro-trauma to the patellar tendon just below the kneecap.
- Prevention: Strengthen the posterior chain (glutes and hamstrings) to take the load off the quads. Incorporate isometric holds (like wall sits) and eccentric decline squats. Ensure players are landing softly, absorbing the impact by bending their hips and knees rather than landing stiff-legged.
B. Ankle Sprains
The most common acute injury in volleyball, usually occurring when blocking or attacking and landing on another player’s foot.
- Prevention: Ankle braces and tape offer external support, but internal strength is vital. Incorporate proprioceptive training (balance work) using wobble boards or single-leg Romanian Deadlifts (RDLs) barefoot on a padded mat. Strengthen the calf and tibialis anterior muscles.
C. Shoulder Overuse Injuries
The repetitive overhead motion of serving and attacking can lead to rotator cuff impingement or labral tears.
- Prevention: Maintain thoracic spine mobility so the shoulder doesn’t have to overcompensate. Strengthen the external rotators of the shoulder using resistance band pull-aparts and face-pulls. Focus on proper attacking mechanics—using the core and torso rotation to generate power rather than relying solely on the arm.
Coach Ravi’s Pro Tip: “Most young athletes focus entirely on their vertical jump, but neglect their landing mechanics. Teaching a player how to land softly and in balance is the single most important thing you can do to protect their knees and ankles for a long, healthy career.”
Conclusion: Your Journey to Volleyball Mastery
Volleyball is a sport of beautiful complexities—a delicate balance of explosive power, split-second decision-making, and seamless teamwork. Whether you are stepping onto the court for the first time, coaching a youth team, or analyzing match statistics to gain a competitive edge, mastering the fundamentals is your most important step.
From understanding the historical roots laid down in 1895 to executing a flawless 5-1 offensive system and prioritizing athlete recovery, this encyclopedia serves as your definitive roadmap. Remember, excellence in volleyball is not achieved overnight. It requires repetition, tactical awareness, and a relentless dedication to improvement. Take these strategies, use the analytics tools provided in this guide, and most importantly, keep your passion for the game alive. See you on the court!
Frequently Asked Questions (FAQs)
How high is a standard volleyball net?
What is the exact role of the Libero?
How many touches is a team allowed per side?
What is considered a good Hitting Percentage?
Can a player touch the net during play?
What is a foot fault in volleyball?
How many sets are in a standard volleyball match?
What are the dimensions of an indoor volleyball court?
What is the difference between a 5-1 and a 6-2 offensive system?
Can you block or spike an opponent’s serve?
What does “sideout” mean?
Can the ball hit the ceiling or overhead obstacles?
Appendix: Comprehensive Glossary of Volleyball Terminology
Understanding the language of volleyball is just as important as mastering its physical skills. Whether you are a beginner stepping onto the court for the first time, a parent watching from the bleachers, or a coach organizing a practice plan, this A-Z glossary covers the essential terminology of the sport.
A-C
- Ace: A serve that results directly in a point, usually because it hits the floor untouched or is severely shanked by the receiving team.
- Antenna: The vertical rods extending upward from the sidelines of the net. The ball must pass between the antennas to cross the net legally.
- Approach: The fast, explosive footwork (usually 3 or 4 steps) an attacker takes toward the net before jumping to spike the ball.
- Assist: Awarded to a player (usually the setter) who passes or sets the ball to a teammate who immediately gets a kill.
- Block: A defensive play by one or more front-row players meant to deflect a spiked ball back into the hitter’s court.
- Campfire: A defensive lapse where a ball falls softly to the floor between multiple players who are all standing around watching it (as if sitting around a campfire).
- Cross-Court Attack: An attack directed diagonally from one side of the court to the opposite side of the opponent’s court.
D-F
- Dig: Successfully passing a forcefully spiked or rapidly hit ball close to the floor.
- Double Contact (Double Hit): A fault called when a player touches the ball twice in succession, or the ball contacts various parts of the body successively.
- Dump: A surprise offensive move, usually executed by the setter on the second contact, to strategically push the ball over the net into an open spot instead of setting an attacker.
- Floater (Float Serve): A serve hit with no spin. The lack of spin creates unpredictable air resistance, causing the ball to aggressively dip or weave.
- Free Ball: A ball returned over the net with an upward pass rather than a spike, usually due to a poor offensive sequence. It is an easy scoring opportunity for the receiving team.
J-P
- Joust: When two opposing players reach above the net and contact the ball simultaneously, trying to push it onto the other side.
- Kill: An attack that results directly in a point or a side-out.
- Libero: A specialized defensive player wearing a contrasting jersey color. They can freely substitute into the back row without counting toward the team’s substitution limit.
- Overpass: A poorly executed first pass (serve-receive) that flies high over the net directly to the opposing team, setting them up for an easy attack.
- Pancake: A spectacular, one-handed defensive play where a player dives and slides their hand flat on the floor (like a pancake) just before the ball lands, causing the ball to bounce off the back of the hand.
R-Z
- Roof: A dominant, aggressive block that stuffs the ball straight down onto the attacker’s side of the floor.
- Rotation: The clockwise movement of players around the court after winning the right to serve (side-out).
- Shank: A wildly off-target pass, usually caused by poor arm-platform angles when receiving a hard serve or spike.
- Side-Out: When the receiving team successfully defends a serve, wins the rally, and earns the right to serve the next point.
- Six-Pack: Occurs when a blocker or defender gets hit squarely in the head or face by a spiked ball.
- Tool (Using the Block): A highly skilled offensive shot where the attacker deliberately hits the ball off the edges of the opponent’s block so it ricochets out of bounds, winning the point.
Coach Ravi’s Pro Tip: “Communication is the most critical fundamental skill in volleyball. Calling ‘Mine!’, ‘Out!’, or ‘Free!’ loudly and early prevents collisions and hesitation. Make it a habit to speak before every single contact.”